Deploy and develop Oracle Functions
Serverless functions, also known as function as a service (FaaS), are a type of cloud computing service where developers can write and deploy code without having to manage the underlying infrastructure. In a traditional server-based architecture, developers are responsible for provisioning, scaling, and maintaining servers to run their applications. With serverless functions, this infrastructure management is abstracted away, allowing developers to focus solely on writing code.
In a serverless architecture, developers create small units of code, often referred to as functions, that perform specific tasks or provide specific functionalities. These functions are then deployed to a cloud provider's serverless platform, such as AWS Lambda, Azure Functions, or Google Cloud Functions.
When an event triggers the execution of a function, such as an HTTP request, a database change, or a scheduled task, the serverless platform automatically provisions the necessary resources to run that function. The code executes in a stateless and ephemeral environment, meaning that each function invocation is isolated from others, and there is no need to maintain persistent connections or manage server instances. Serverless functions offer several benefits:
- Scalability: Serverless platforms automatically scale the resources allocated to functions based on the incoming workload. Functions can handle a few requests or scale up to thousands or more, depending on demand.
- Cost-efficiency: With serverless, you only pay for the actual execution time of your functions, rather than paying for idle server time. This can result in cost savings, especially for applications with unpredictable or intermittent workloads.
- Simplified infrastructure management: Developers can focus on writing code and not worry about server provisioning, scaling, or maintenance. The serverless platform takes care of these operational aspects, including high availability and fault tolerance.
- Rapid development and deployment: Serverless functions enable quick iterations and faster time to market. Developers can write and deploy code in smaller, modular units, promoting agile development practices.
- Team Autonomy and Productivity: Serverless architecture enables organizations to adopt a decentralized approach to development, with cross-functional teams responsible for specific Serverless. This autonomy allows teams to work independently, make decisions quickly, and release updates more frequently, leading to increased productivity and faster time-to-market.
- Continuous Deployment and DevOps: Serverless architecture aligns well with DevOps practices and continuous deployment. Each Serverless function can be deployed independently, allowing for faster and more frequent deployments, easier integration, and faster feedback loops.
- Automatic scaling and high availability: Serverless platforms handle the scaling and distribution of function instances across different servers, ensuring high availability and reliability without any manual intervention.
Serverless functions have gained popularity because they offer simplicity, scalability and cost-efficiency for building and deploying applications in the cloud. They are commonly used for tasks like handling API endpoints, processing background tasks, performing data transformations, and integrating with other services in a microservices architecture.
Oracle Functions
Oracle Functions is a serverless compute platform offered by Oracle Cloud. It allows developers to build, deploy, and scale applications without having to worry about the underlying infrastructure. With Oracle Functions, you can focus on writing your code and let the platform handle the operational aspects, such as scaling, monitoring, and fault tolerance.
Getting started
Follow requirements and installation steps below.
When working with Oracle Functions, there are generally two different workflows involved: the development workflow and the deployment/management workflow. Let's explore each of these workflows:
Development workflow
Function Creation: In this step, developers write the code for their functions. They can choose the programming language of their preference, such as JavaScript, Python, or Java, depending on the supported languages by Oracle Functions.
> fn init --runtime python hello_world
Development environment: In this step, you want to actually develop the functionality. To do this you need to spin up a docker container with your function. Start by creating a docker-compose.yaml and a Dockerfile.
version: "3.7"
function:
    build:
    context: .
    dockerfile: Dockerfile
    container_name: hello_world
    environment:
    - FN_FN_NAME=hello_world
    - FDK_DEBUG=1
    - FN_FORMAT=http-stream
        - FN_LISTENER=unix:/tmp/func.sock
    env_file:
        - .env
    entrypoint: sh -c "ls /function/func.py | entr -nr fdk /function/func.py"
    restart: unless-stopped
    volumes:
        - ./:/function/
FROM fnproject/python:3.9
WORKDIR /function
ADD . /function/
ADD requirements.txt /function/
RUN printf "[ol8_developer_EPEL]\nname= Oracle Linux \$releasever EPEL (\$basearch)\nbaseurl=https://yum.oracle.com/repo/OracleLinux/OL8/developer/EPEL/\$basearch/ \ngpgkey=file:///etc/pki/rpm-gpg/RPM-GPG-KEY-oracle \ngpgcheck=1 \nenabled=1" > /etc/yum.repos.d/ol8-epel.repo
RUN microdnf install git vi unzip wget libbsd make gcc inotify-tools
# We need entr library to start our ENTRY_POINT in docker-compose.yaml
RUN git clone https://github.com/eradman/entr && cd entr/ && ./configure && make test && make install
RUN mkdir /python && chmod -R o+r /python
RUN pip3 install  --no-cache --no-cache-dir -r requirements.txt &&\
    rm -fr ~/.cache/pip  requirements.txt func.yaml Dockerfile .venv
Start docker container: When docker-compose.yaml and Dockerfile is made, its now possible to spin up the hello_world container. Do this with:
                    >docker-compose up


hello_world  | None - fdk - DEBUG - entering handle

hello_world  | None - fdk - DEBUG - FN_FORMAT is set, value: http-stream

hello_world  | None - fdk - DEBUG - FN_LISTENER is set, value: unix:/tmp/func.sock

hello_world  | None - fdk - DEBUG - in http_stream.start

hello_world  | None - fdk - DEBUG - deleting socket files if they exist

hello_world  | None - fdk - DEBUG - CHMOD 666 /tmp/phonyfunc.sock

hello_world  | None - fdk - DEBUG - phony socket permissions: 0o140666

hello_world  | None - fdk - DEBUG - calling '.start_serving()'

hello_world  | None - fdk - DEBUG - sym-linking /tmp/func.sock to /tmp/phonyfunc.sock

hello_world  | None - fdk - DEBUG - socket permissions: 0o140666

hello_world  | None - fdk - DEBUG - starting infinite loop

hello_world  | None - fdk.async_http.server - DEBUG - Starting worker [8]
This will build the image and start the container. You should be able to see it this command:
> docker ps

CONTAINER ID   IMAGE                       COMMAND                  CREATED         STATUS         PORTS     NAMES
093fa7e4bf04   hello_world-function        "sh -c 'ls /function"   7 minutes ago   Up 2 minutes           hello_world
To run the hello_world function, you need to run this command to get “inside” the container:
> docker exec -it 093fa7e4bf04 bash
bash-4.4# ls -l
total 20
-rw-r--r-- 1 1001 1010 742 Jun  7 10:24 Dockerfile
-rw-r--r-- 1 1001 1010 452 Jun  7 10:27 docker-compose.yaml
-rw-r--r-- 1 1001 1010 576 Jun  7 10:16 func.py
-rw-r--r-- 1 1001 1010 210 Jun  7 10:16 func.yaml
-rw-r--r-- 1 1001 1010  11 Jun  7 10:16 requirements.txt
bash-4.4# pwd
/function
As you can see we are now “inside” the container and can see the same files as we have in out hello_world folder (~/fnproject/hello_world)
Running function: You now have a container running with you function code. To execute your hello_world function lets great a payload.json first. You can do this outside or inside your container, as the /function folder is mapped to your outside folder: ~/fnproject/hello_world (Check “volumes” in docker-compose.yaml)
bash-4.4# vim payload.json
                            {

                                "name" : "Working Minds"

                            }
When this is done, we are ready to run hello_world
> curl -i --unix-socket "/tmp/func.sock"  -XPOST http://function/call -d @payload.json

HTTP/1.1 200 OK
Connection: keep-alive
Keep-Alive: 75
content-type: application/json
fn-fdk-version: fdk-python/0.1.57
fn-fdk-runtime: python/3.9.7 final
content-length: 34
{"message": "Hello Working Minds"}
Deployment/Management Workflow
This workflow depends a lot on the current Oracle Cloud setup. Review Installation steps.
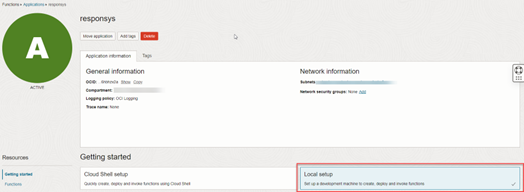
Go to your function APPS. Create one if you don't already have.

Under you app, you can find instructions under “Getting started”
Requirements
To work with Oracle Functions effectively, there are a few requirements and considerations:
- Oracle Cloud Account: You need to have an active Oracle Cloud account to use Oracle Functions. If you don't have one, contact your administrator.
- Access to Oracle Functions: Make sure you have the necessary access and permissions to create and manage functions within your Oracle Cloud account. This may involve setting up appropriate user roles and policies.
- Function Development Environment: You will need a development environment to write and test your function code. Oracle Functions supports multiple programming languages, including Java, Node.js, Python, and Go. Ensure that you have the necessary tools and dependencies installed for your chosen language.
- Oracle Cloud Infrastructure (OCI) CLI: The Oracle Cloud Infrastructure Command Line Interface (OCI CLI) is a command-line tool that allows you to interact with Oracle Cloud services, including Oracle Functions. Install and configure the OCI CLI on your local machine to manage and deploy your functions.
- Function Configuration: Before deploying a function, you need to define its configuration settings, such as the function name, memory allocation, timeout duration, and any required triggers or bindings. You can specify these settings using either the OCI CLI or the Oracle Cloud Infrastructure Console.
- Networking and Security: Ensure that you have a properly configured virtual network in Oracle Cloud that can securely host your functions. You may need to set up appropriate security rules, network access, and other relevant configurations.
- Monitoring and Logging: Consider setting up monitoring and logging capabilities for your functions. Oracle Cloud offers services such as Oracle Cloud Infrastructure Monitoring and Oracle Cloud Infrastructure Logging, which can help you track the performance and troubleshoot issues with your functions.
Installation
To start coding you need to install the following If you are on Windows, you must install WSL
Windows Subsystem for Linux (WSL)
-
Enable WSL Feature
- Open the Start menu and search for "Turn Windows features on or off" and open it.
- Scroll down and locate "Windows Subsystem for Linux".
- Check the box next to it and click "OK".
- Wait for the installation to complete, and then restart your computer when prompted.
-
Install a Linux Distribution
- Open the Microsoft Store on your Windows machine.
- Search for your preferred Linux distribution, such as Ubuntu, Debian, or openSUSE.
- Choose the desired distribution and click on "Get" or "Install".
- Wait for the download and installation to complete. This may take a few minutes depending on your internet speed.
-
Launch and Set Up Your Linux Distribution.
- Open the installed Linux distribution from the Start menu or by searching for its name.
- The first time you launch it, the distribution will initialize and set up the necessary files.
- You will be prompted to create a username and password for your Linux distribution.
Oracle Cloud Infrastructure Command Line Interface
-
Verify System Requirements
- Ensure that you have a supported operating system. OCI CLI supports Windows, macOS, and Linux distributions.
- Verify that you have Python 3.5 or later installed on your system.
-
Install OCI CLI
- Open a terminal or command prompt on your system.
- Run the following command to install OCI CLI using pip (Python package manager):
-
Terminal
> pip install oci - Wait for the installation process to complete.
-
Configure OCI CLI
- After installing OCI CLI, you need to configure it with your Oracle Cloud account details.
-
Run the following command to start the configuration process:
Terminal> oci setup config - You will be prompted to enter your Oracle Cloud user credentials, including the Oracle Cloud Infrastructure tenant OCID, user OCID, and region. Follow the prompts and provide the required information.
-
If successful, OCI CLI will create a configuration file
(~/.oci/config)on your system, which stores your authentication details.
-
Test OCI CLI:
-
To verify that OCI CLI is properly installed and configured, run a simple command,
such as checking the available compartments in your Oracle Cloud account:
Terminal> oci iam compartment list - If everything is set up correctly, you should see a list of compartments displayed in the output.
-
To verify that OCI CLI is properly installed and configured, run a simple command,
such as checking the available compartments in your Oracle Cloud account:
Docker
-
Windows
- Visit the Docker website (https://www.docker.com/) and navigate to the "Get Docker" section.
- Click on "Download Docker Desktop for Windows".
- Follow the on-screen instructions to download the installer.
- Once downloaded, double-click on the installer file and follow the prompts to install Docker Desktop.
- During the installation, Docker Desktop may prompt you to enable Hyper-V and/or Windows Subsystem for Linux (WSL) features if they are not already enabled on your system.
- After installation, Docker Desktop should be running, and you can access it from the system tray.
-
macOS
- Visit the Docker website (https://www.docker.com/) and navigate to the "Get Docker" section.
- Click on "Download Docker Desktop for Mac".
- Once downloaded, double-click on the installer file and follow the prompts to install Docker Desktop.
- During the installation, you may be prompted to authorize Docker to run on your system.
- After installation, Docker Desktop should be running, and you can access it from the menu bar.
-
Linux
- Docker provides installation instructions for various Linux distributions on their website (https://docs.docker.com/engine/install/).
- Select your Linux distribution from the list and follow the instructions provided.
- The instructions typically involve adding the Docker repository, installing the Docker engine, and setting up Docker to run as a non-root user.
- After installation, Docker should be up and running, and you can use the Docker command-line interface to interact with it.
Once Docker is installed, you can verify the installation by opening a terminal or command prompt and running the command docker version. This will display the installed version of Docker and its components.
docker-compose
-
Windows
- Docker Compose is included in Docker Desktop for Windows, so if you have already installed Docker Desktop, Docker Compose should already be available on your system.
-
Open a terminal or command prompt and run the command
to verify the installation and display the installed version.Terminal
> docker-compose --version
-
macOS
- Docker Compose is included in Docker Desktop for Mac, so if you have already installed Docker Desktop, Docker Compose should already be available on your system.
-
Open a terminal and run the command
to verify the installation and display the installed version.Terminal
> docker-compose --version
-
Linux
- Docker Compose is a separate package on Linux and needs to be installed manually
- Open a terminal and run the following commands to download and install the latest version of Docker Compose.
> sudo curl -L "https://github.com/docker/compose/releases/latest/download/docker-compose-$(uname -s)-$(uname -m)" -o /usr/local/bin/docker-compose
> sudo chmod +x /usr/local/bin/docker-compose
After installation, run the command
> docker-compose --version
to verify the installation and display the installed version.
Once Docker Compose is installed, you can use it to define and run multi-container Docker applications using a YAML file. Docker Compose simplifies the process of managing multiple containers and their interdependencies.
To learn more about how to use Docker Compose, refer to the official Docker documentation (https://docs.docker.com/compose/). It provides detailed instructions and examples on creating and managing Docker Compose projects.
Congratulations! You have successfully installed Docker Compose on your system, and you can now leverage its capabilities to orchestrate your multi-container Docker applications.
Install Fnproject
To install the Fn Project on your system, follow the steps below:
-
Prerequisites
- Make sure you have Docker installed and running on your system. The Fn Project relies on Docker for containerization.
-
Install Fn CLI
- The Fn CLI is a command-line tool used to interact with the Fn Project.
-
Open a terminal or command prompt and run the following command to install the Fn
CLI
Terminal> curl -LSs https://raw.githubusercontent.com/fnproject/cli/master/install | sh - This command will download and install the Fn CLI on your system.
-
Start Fn Server
-
Once the Fn CLI is installed, start the Fn Server by running the following command:
Terminal> fn start - This command will pull the necessary Docker images and start the Fn Server.
-
Once the Fn CLI is installed, start the Fn Server by running the following command:
-
Verify Installation
-
To verify that the installation was successful, run the following command to check
the version of the Fn CLI
Terminal> fn version - This command should display the version of the Fn CLI that was installed.
-
To verify that the installation was successful, run the following command to check
the version of the Fn CLI